

How To Install Alien Skin
Enlarging photos appears to be a simple and mundane chore for the average user. But every bit a pro, you understand the ramifications of firing upwards Photoshop and only using the Paradigm Size dialog box, or worse yet, just stretching an image in your page layout application.

Blow Up ii, from Conflicting Peel Software, is a Photoshop plugin that produces high-quality image enlargements by using an algorithm which temporarily converts pixels in your photo to vectors. The results are a sharper, more than detailed enlargement.
Read more…
Out of the box, Blow Up works with images in Grayscale, Duotone, RGB, CMYK, and Lab color spaces, dissimilar Genuine Fractals Pro, a competitor to Blow Up ii, which costs $l more than for this flexibility. Blow Up is likewise the only resizing plugin that supports 32-scrap images, along with 16 and 8-fleck files every bit well.
Once installed, Blow Up is plant in Photoshop's File -> Automate menu, an odd location past virtually standards. Thankfully, that's really the nigh confusing aspect of using the plugin—everything else is straightforward. Also, unlike competing plugins, Blow Up doesn't require y'all to save an external file, and then re-open it at the desired size—you work in ane file and the enlargement is produced immediately upon committing your preferred settings.
The Blow Up dialog window offers a surprising amount of command and features. A Settings tab offers more than than 100 presets for mutual output sizes and newspaper types, making cropping and resizing a one-click affair. For more precise results, you can use the Controls tab. Along with standard sizing, resolution, and cropping tools, Blow Up features an Auto-Crop option—and so if you take a horizontal image and want to resize information technology for vertical output, Blow Upwards will intelligently crop the image. In my tests, it worked quite well in most cases.
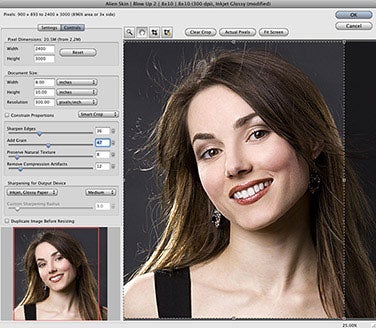
One time you decide on the desired output size, resolution, and cropping of your image, you can move on to using a few image adjustments to aid in creating the all-time possible appearance of your enlarged image. With simple sliders or number input boxes, you tin adjust a few aspects of the image y'all meet in the preview console to the right of the controls, which is updated on-the-wing.
- Acuminate Edges: This does just what yous would expect, sharpening the contrasting pixels (edges) in your image
- Add Grain: Yous would think that the goal is to remove grain, only information technology actually serves to produce a more detailed and natural image.
- Preserve Natural Texture: This aligning creates a more organic wait to textured areas of a low-resolution image.
- Remove Compression Artifacts: Here, you're removing blocky artifacts and edge halos created when enlarging an image.
Then what were the results of my tests? I used several dissimilar images—some grayscale, some color—with a diversity of subject matter. The results in all cases were quite good, with some being cypher brusque of stunning.
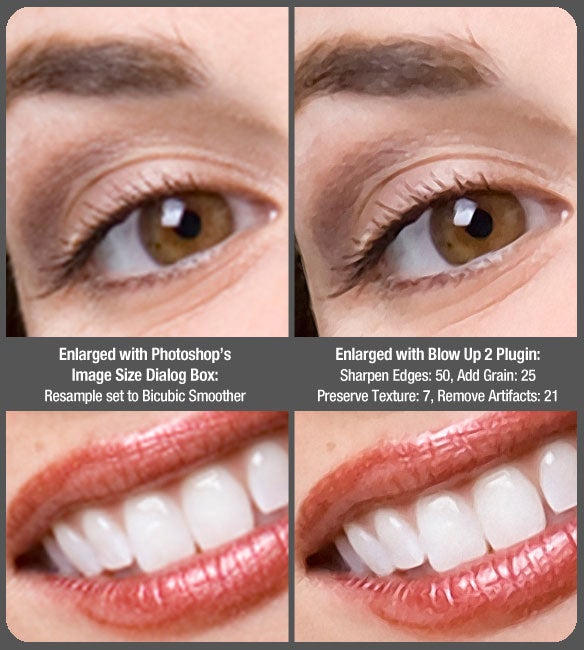
For the sample image beneath, I took a 3-by-4.five-inch image at 300 dpi, and enlarged information technology to 9-by-13.5 inches (still at 300 dpi). Using Photoshop's standard Prototype Size dialog box produced the results on the left, Accident Upwardly results are displayed on the right. As you can see, the results are dramatically different. When printed and viewed at full resolution, the Blow Up enlargement looks significantly sharper—to the signal where just the most trained heart tin can tell the image was enlarged. The screenshots only don't practice it justice.
When a depression-resolution image is all nosotros have to work from, enlarging them with Photoshop alone by and large yields completely unacceptable results. Blow Up surprised me in this expanse. I took a 500-past-750-pixel image at 72 dpi (screen resolution) and enlarged it to 7-by-10.5 inches at 300 dpi. I adjusted the previously mentioned settings and also used the custom output sharpening radius slider. While the results weren't about as groovy equally when yous start with a high-resolution source paradigm, it was still quite impressive. In fact, it was more than proficient enough for loftier-quality commercial printing by my standards—this of course varies with image quality.
Priced at $249, Blow Up 2 isn't for everyone. It's certainly not the tool for those who but occasionally have the employ for such a plugin. But if your work involves bus/car-wraps, outdoor boards, large-format press or yous accept clients who frequently provide you with minor or depression-resolution images, Blow Upwards will pay for itself in no time, especially since it offers a Batch option. In general, I constitute cipher to mutter near outside of the odd location in the Automation menu.
Blow Up 2 requires Photoshop CS2 and later or Photoshop Elements iv.0.1 and later on. Information technology runs on Macs powered by either a G5 or Intel processor. A 30-day demo of Blow Upward 2 is bachelor from the Alien Pare Spider web site.
[James Dempsey runs The Graphic Mac, which offers tips, reviews and commentary on all things Mac OSX, Adobe Creative Suite, and the Cyberspace.]

Source: https://www.macworld.com/article/198625/blowup2.html
Posted by: alamedamancitagage.blogspot.com
0 Response to "How To Install Alien Skin"
Post a Comment